Cosplay Progress: Dorothy from Garakowa: Restore the World
It’s been awhile since Sakuracon, but I wanted to write up a masterpost of my Dorothy cosplay that I made while volunteering for ACParadise. The entire process was fairly straight foward, with new challenges in patterning out unique design elements and figuring out how to enable easy, comfortable wear for volunteering in.

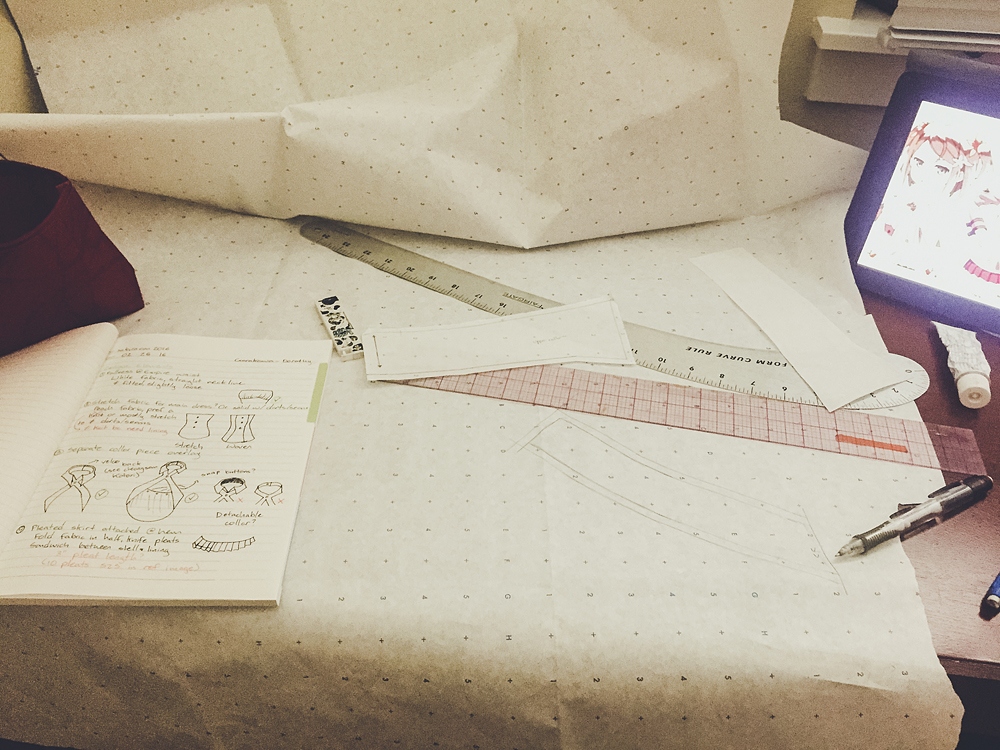
For starters, here’s a pretty standard example of my workstation when I start patterning. I like taking apart each costume and breaking them up by sections to work on in a notebook. I write in pen because I don’t want to focus too much on one specific sketch or idea, which encourages me to try to create as many different variations as I can. My iPad comes in handy for looking up and zooming in on reference pictures, or quickly searching for certain sewing methods if I get stuck on something. My desk is in a corner though so it can get pretty cramped when laying out patterning paper….
The collar piece was the first part of Dorothy that I worked on! I felt that her wrap-around collar was the hardest part patterning-wise, so I tackled that one first. I decided to pattern a back neck closure so that as little seams as possible would be needed for a clean look. The V-part was a little difficult but I was able to get it right after 3 tries!
guahhhhhh
Here’s version 1! I write on my muslin test pieces a lot. For me it takes away a sense of permanence/fear of failure by marking everything (don’t be afraid to redo!), and it comes in handy if I need to trace over a piece to create the next version of a pattern.
The V wasn’t prominent at all, and the collar sat way too high on my neck. I had to relax everything so that it was more like a shirt collar and less like a choker.
My initial idea for the neck closure was to use velcro for easier dressing – but then I changed up how I was going to attach everything and opted for snaps instead.
Next I worked on the wrap-around X design with version 2. This is probably the 2nd version of the X design – the 1st one was horrific. But I was seeing quick progress – despite how long these took to set up!
For the cleanest lines possible, everything was sewn right sides together, and then turned inside out to hide all of the stitching. It was tough with how skinny I had made the X.
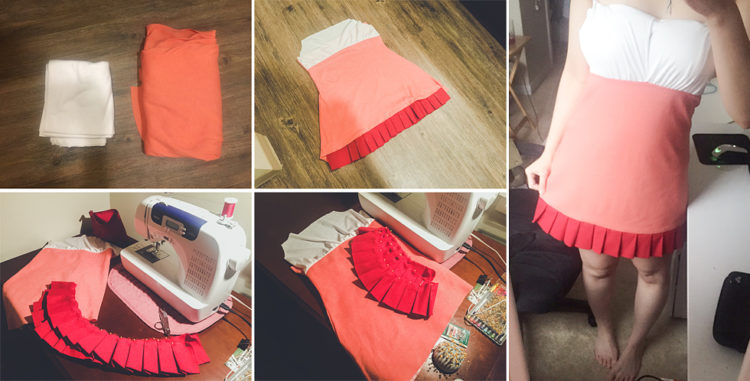
Meanwhile, Dorothy’s main dress was a very simple silhouette patterning-wise. I started by hand-dyeing a white cotton jersey fabric using a mix of RIT Dye colors. Above is a before and after color comparison. Dyeing is probably one of my favorite aspects of costumemaking. It’s fun mixing colors together and seeing if I can get close to the original art.
I used stretchy interfacing for Dorothy’s dress around my waist all the way to the hem so that the outlines of my safety shorts wouldn’t show through. It gave the fabric a very clean look, and it’s also perfect for sewing in zippers without puckering/bubbling (I did this for my Hakogaku jersey a few years ago as well). It helped a ton when I had to sew the red pleats to the bottom of my dress, and also provided structure on my sleeves.
For the white bust area, I used a thinner, silkier knit fabric. I liked the feeling of this fabric a lot, but with one layer it was pretty sheer. Since I wanted to get more delicate gathering under the bust, I took a risk and doubled it up to keep it opaque. Thankfully, it turned out just how I wanted it to!
For support, I debated whether or not to try a halter clear strap underneath the white collar. I was worried about how that would clash with the X-collar, so I decided to encase a bandeau bra inside the bust instead. It worked for the most part LOL! I might go back and add clear straps just to be safe, though.
The red pleated hem is a doubled up red twill fabric using knife pleating.
Ready to attach!
At this point, I didn’t have a serger so the edges were raw when I stitched the hem together. That’s something I’ll definitely fix soon! Here you can see where I fully tacked the inside pleats down to keep the folds stabilized and uniform. By tacking, the outside pleats have a clean look that doesn’t unfold with wear.
So many tails needing to be cut! I was on a mission to get this done fast. 😛
Finished up the X-collar! I went with a stretch sateen cotton, because I love working with it and it gives this very substantial, solid look – especially with light interfacing. I think there’s still more I could have done to make it look better, but I was satisfied enough with how it turned out!
Using snap buttons on the back of the collar makes it very easy to put everything on by myself. There’s also an invisible side zipper on the dress, but I ended up not needing it due to how stretchy everything was. My dress form is about a size up from me so it doesn’t completely rest well. I need a new form. (,,꒪꒫꒪,,)
There are side seams that connect the X-collar to the back for a full wrap-around effect. I didn’t want a center front or a center back seam, because Dorothy had a very clean design that I didn’t want to take away from when creating my cosplay. It took a little while to envision the outcome.
There are side seams that connect the X-collar to the back for a full wrap-around effect. I didn’t want a center front or a center back seam, because Dorothy had a very clean design that I didn’t want to take away from when creating my cosplay. It took a little while to envision the outcome.
This collar was hard work! LOL
I think I’d have a lot of fun if a cosplay involved an unreasonable amount of large bows. They’re so easy to make!! This is the front bow of Dorothy’s costume. For consistency, I used stretch sateen cotton and dyed it light yellow from white with RIT Dye.
After the X-collar, figuring out how to do the sleeves was my next challenge. I ended up creating two pieces and sewing them at the bicep. Like the bottom hem of the dress, the top edge of the sleeve is interfaced for easier bias tape encasing. I sewed straps of faux leather onto the ends of the sleeves and (after these photos) stitched them together and attached buttons.
There were a couple more steps not documented, but overall I was able to finish this cosplay with little issue. A few things I want to fix up for future wear is in the works, but I had a lot of fun making her cosplay and volunteering with ACP again! Hopefully I can get nicer shots and maybe even work on her weapon >< we’ll see!


